Idea Bank 2020: Laser Maze
- Jed

- May 23, 2021
- 6 min read
One of the most awe-inspiring experiments featured in Operation Einstein's signature small group sessions is the DIY Laser Light Show.
This contraption was conceptualized and constructed by our Einstein Advisor Professor Sow Chorng Haur, the Head of Department for Physics at the National University of Singapore (NUS).
As seen from this stunning video taking from Operation Einstein's Instagram Page, speaking or singing into a hollow tube causes vibrations that creates beautiful laser patterns.
But did you know that lasers are not just great for creating your very own light shows?
Today, Operation Einstein will be featuring another exciting experiment from our Idea Bank, the Laser Light Maze.
In this activity, your task will be to use common household materials to construct and solve your very own maze!
Section 1: Materials
Stationery:
Pencils/Pens/Markers
30 cm ruler
Scissors
Protractor
Wet glue/White glue
Scotch Tape
Other Materials:
Cardboard (30 cm x 40 cm)
Small Piece of White Paper (5 cm x 4 cm)
Toothpicks
Thin mirror planes (about 2 cm x 5 cm) / aluminium foil / nail clippers
Transparent rectangular takeaway plastic container (approximately 17.4cm x 12cm x 4cm) filled with about 500 ml of water
Low frequency laser pointer (only facilitators would have access and control over them)
Laser safety glasses or sunglasses (optional)
Volunteer / Adult Supervision Required!
Only facilitators will have control over the laser pointers
Wear laser safety glasses (or sunglasses) when the laser is turned on
Do not look directly into the laser pointer when it is turned on
Use scissors carefully
Section 2: Procedure
A | Preparation
Cut out a rectangular piece of cardboard of exact dimensions 30 cm x 40 cm to use as the ‘maze base’.
Draw the maze layout (lines in black) shown below on the ‘maze base’ using a pencil/pen and a ruler.
Cut out small pieces of cardboard which will form the ‘walls’ (about 4 cm tall) inside the maze and the ‘walls’ surrounding the perimeter of the maze.
Glue these ‘walls’ on the lines drawn and the perimeter of the ‘maze base’.
Cut out a square piece of paper of dimensions 5 cm x 4 cm and glue it to the ‘wall’ at the end of the maze.
Place a transparent takeaway plastic container filled with water on the ‘maze base’ as indicated on the diagram below (approximately 17.4cm x 12cm x 4cm).
Tape one toothpick to the center of each mirror plane to create the ‘reflectors’.
The toothpicks will be used to poke/insert the ‘reflectors’ into the cardboard ‘maze base’ to create 6 reflectors.

Alternative Materials & Troubleshooting:
If there are no mirror planes available, tape a piece of aluminium foil to a piece of cardboard with the shiny side facing outwards, and poke the toothpick through the cardboard to create a ‘reflector’.
If the aluminium foil is not shiny enough, polish the aluminum foil using sand paper
Nail clippers can also be used as ‘reflectors’
B | Solving the Maze
Put on the laser safety glasses (if provided)
[This entire step will only be performed by facilitators] Cut out a small piece of cardboard the size of the laser pointer and tape it on the ‘power button’ of the laser pointer.
This will cause the laser pointer to be permanently turned on. Ensure that no one looks directly into the laser.
Place the laser pointer at the start of the maze parallel to the ‘walls’. Tape the laser pointer onto the ‘maze base’ to secure it.
Switch off most of the lights in the room for the laser to be seen clearly.
The goal of the maze is for a dot to be seen on the small piece of paper at the end of the maze. Insert these ‘reflectors’ in the maze and rotate them if needed to guide the laser to the end point. Once a dot is seen on the small piece of paper at the end of the maze, the maze is completed.
Section 3: Explanation
Perpendicular = 90 degrees
Light travels in a straight line
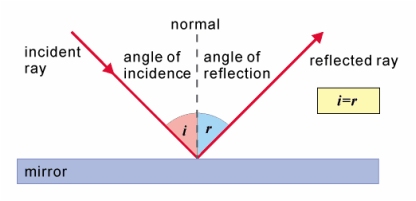
Reflection (Principles of Reflection)
Angle of incidence = angle of reflection
Incident ray, reflected ray and normal all lie on the same plane
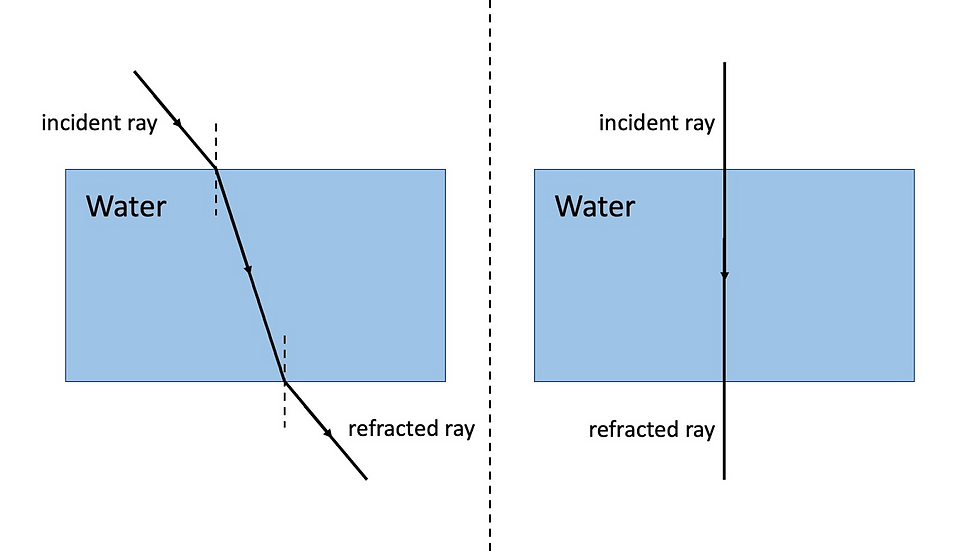
Refraction
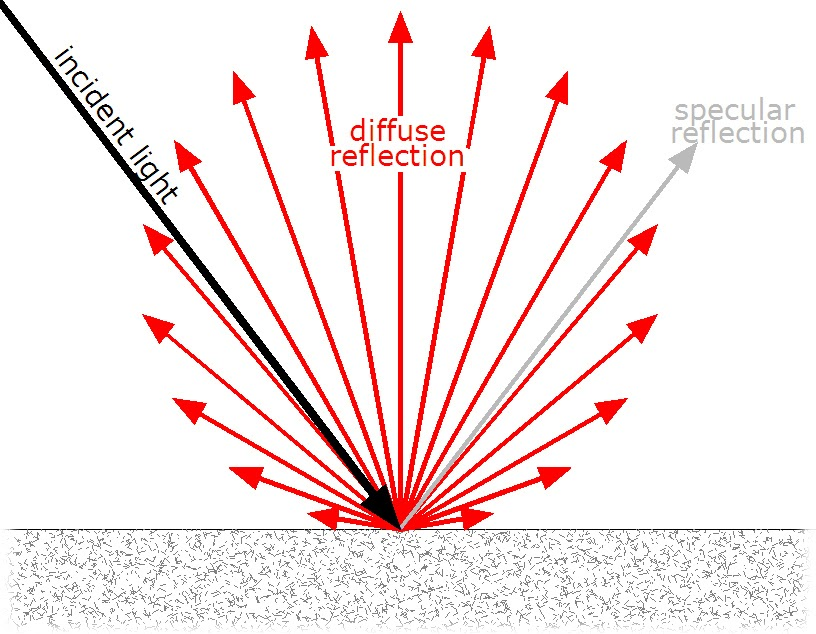
Specular and diffuse reflection
Light Travels in a Straight Line
Light rays travel in straight lines and can be illustrated to the primary school students as arrows with directions from a light source.
Hence, when light reaches an opaque object, shadows or areas without light are formed. This is because light rays travel in straight lines and are unable to pass through opaque objects. (Light is blocked by opaque objects)
This is demonstrated by the laser not being able to pass through the cardboard ‘walls’.
Reflection

When a light ray known as the incident ray falls on a shiny surface (a ‘reflector’) at a corner of the maze, the light ray will bounce off the shiny surface (a ‘reflector’) which will become a reflected ray.
The point where the light ray strikes the incident surface is called the point of incidence.
If we were to draw a line perpendicular to the mirror surface through the point of incidence (point where the light ray meets the mirror surface), that would form the normal (perpendicular to the mirror).
If we were to measure the angle of both: the incident ray (original light ray that met the mirror surface) AND the reflected ray to the normal (line perpendicular or 90 degrees to the mirror surface), we would realize that both angles are equal
The angle of incidence (∠i) is equal to the angle of reflection (∠r), and this relationship is represented by the equation: ∠i = ∠r
This can be demonstrated by tracing the light ray of the laser where it is reflected on the ‘maze base’ using a pencil and measuring the angle of incidence (∠i) and angle of reflection (∠r) using a protractor.
It will be observed that the angle of incidence and angle of reflection are equal (∠i = ∠r).
Refraction
When the light ray passes through a transparent material (the container of water), the light ray seems to have “shifted”/bent.
This is due to the light ray slowing down as it enters the transparent material that causes the speed of light to reduce.
The light ray bends towards the normal

When the light ray leaves the transparent material, the ray of light speeds up as it enters air again which increases the speed of light back to its original speed in air.
The light ray bends away from the normal.
When the light ray enters the transparent material (the container of water) perpendicular to the surface of the material, the light ray does not bend as refraction does not take place at all.
This is because when the angle of incidence is zero degrees, the angle of refraction will be zero degrees as well.
Light tends to travel the shortest path when the light rays bend.
However, when the light ray is travelling perpendicular to the surface (i.e. angle of incidence is zero degrees), it is already travelling at the shortest path, hence it would not bend.
Specular and Diffuse Reflection
A light beam can be visualized as a bundle of individual light rays travelling parallel to one another. Each individual light ray in the bundle obeys the law of reflection.
Reflection of smooth surfaces causes reflections known as specular reflections.
If the bundle of light rays reaches a smooth surface, the light rays reflect and remain concentrated in a bundle upon leaving the surface.
This is demonstrated by reflection on smooth mirror planes.
Reflection of rough surfaces causes reflections known as diffuse reflections.
If the surface is rough, the light rays will reflect and scatter in many different directions.
This is demonstrated by reflection on rough aluminium foil.

Analogy: Bouncing a Ball on Concrete Surface vs on Sandy Surface
note: might need to explain kinetic energy also
On Concrete (smooth surface)
Ball bounces to almost its original height (i.e. where it is dropped from)
Most energy converted to kinetic energy of the ball
Most energy is conserved/concentrated/[no scattering of particles] → concentrated reflected light ray
On Sand (rough surface)
Ball bounces back up to a height that is much lower than the original height which it was dropped from
Most of its gravitational potential energy is converted to kinetic energy of the ball AND the sand particles
Scattering of energy/[scattering of sand particles] → scattering of reflected light ray
Section 4: Application & Extension
Possible Extensions:
Try completing the maze using another path. There are a total of 3 possible paths in this maze
Try creating another map from scratch and solve it. The ‘walls’ that you have constructed can be reused and rearranged.
Try using more/less reflectors to complete the maze.
Guiding Questions:
How do the number of ‘reflectors’ affect the light intensity of the laser? (not all light is reflected at each ‘reflector’, the greater the number of ‘reflectors’, the lower the light intensity of the laser)
Do different ‘reflectors’ (i.e. mirror planes, nail clippers, aluminium foil) reflect light differently? (e.g. more/less light is reflected —specular vs diffuse reflection ref. to “EXPLANATION”)

Comments